How to connect Yaesu FT-891 to a pc using FLDIGI under GNU/Linux, using CAT U5 LINK interface
I searched this topic all around and I found a lot of wrong informations.
Seem that some old howto was simply copypasted into other howto's, propagating some errors.
So I wrote MY OWN HOWTO about how to connect the YAESU FT-891 to a laptop or a computer, using GNU/Linux operating system and a CAT interface called U5 LINK.
In this howto, I'm assuming you know how to use and manage your GNU/Linux system. If not... learn! 🙂
CABLES CONNECTIONS
You need to connect everything: the CAT interface to the yaesu and the computer, the computer itself to the yaesu radio.
- AUDIO connections: use 2 jacks cables, from the cat interface to the computer; one goes to the output and one goes to the mic input of the pc. This is simple and I dont wanna waste time explaining this trivial setup. If you have a laptop with the damned 4 pin jack, you need some sort of adapter to split MIC and AUDIO OUTPUT from the laptop to go into the CAT interface. Do your math!
- CAT INTERFACE to YAESU: here came 2 cables that connects to the CAT and to the rear of the YAESU FT-891. They can't be inserted wrong or reversed, because they're different. Don't push or force them in position: they must slide normally. Again, be careful and do your homework.
- USB CABLE from PC to YAESU! This is THE TRICKY PART that drove me nuts: the damned USB CABLE! I wasted days because I connected it wrong.
CAT interface has an USB connector and I used that. THAT CAT USB CONNECTOR MUST NOT BE USED.
The USB Cable must be connected from your computer to the BACK OF THE YAESU FT-891.
Leave the USB connector on the CAT interface alone! I plugged mine with a piece of electrical black tape so I never see it again.
I don't know for what it's used. And I don't wanna know, really. I can't find any usage manual about this damned CAT U5 LINK interface for Yaesu.
USB DRIVERS? WHAT DRIVERS? THIS IS GNU/LINUX!
- You don't need any serial driver whatsoever if you're using GNU/Linux. Your USB to SERIAL port device (the Yaesu itself) MUST be seen as a new serial port, usually /dev/ttyUSB0 or something like that. You can use "dmesg" on a console to check the correct serial port. Depending on the distro you're using, you need to be root to use the following command:dmesg | grep USB
SOFTWARE INSTALL FOR GNU/Linux
Now for the software part: being on DEVUAN Gnu/Linux 😉 I just had to install fldigi and flrig. You need to be root to do this:
apt-get install fldigi flrig
Check your GNU/Linux distro: debian based distro's use apt-get to install sw, other distros can be different. Do your math.
RADIO SETTINGS
Now everything is ready and connected. We must set the radio to accept this setup, so here are THE CORRECT SETTINGS, NOT THE WRONG SETTINGS PRESENT IN EVERY OTHER F%£^ING HOWTO I HAD TO READ BEFORE!
FT-891 MENU SETTINGS FOR CAT INTERFACE AND GNU/LINUX FLDIGI OPERATION
- 05-06 CAT RATE: 38400
This is the serial port speed. It can be set to other speeds, accordingly with your desidered serial port speed, to be set up into flrig software! 4800, as seen on all the wrong howto's, is slow and the radio reaction is somehow slow. 38400 is working good for me. Serial speed - the higher, the best! If you have problems with high speed, probably your USB cable is somehow defective or low quality. Try some speeds, they must match together (you set a speed in the radio, must be the same on your software!) - 05-07 CAT TOT: 1000ms
This set the timeout timer for the CAT command input.
This works for me at 1000ms. The howto's around says 100ms. - 05-08 CAT RTS: Enable
This is need to monitor the computer using the RTS serial signal.
This is the default setting, btw - 07-11 CW FREQ DISPLAY: FREQ
This set the display frequency offset when you switch between SSB and CW.
FREQ display the same frequency for CW and SSB, no offset added, while PITCH display the CW frequency mode with the pitch added (check the Advanced Manual of your FT891 for details).
Other howto's say "(not sure on this – just following N1RWY’s instructions)".
I'm using FREQ and I feel good about that 🙂 - 07-12 PC KEYING: RTS
RTS is needed here to control the transmission from the USB virtual serial port using, as said, RTS. 🙂
Other settings are described in the Advanced Manual for the FT891.
RTS works OK for me - 08-01 Data Mode OTHERS
This select the operating scheme (PSK or OTHERS) in the DATA mode We use OTHERS.
This was the first source of CURSES.
It was originally written as an obscure "062 Data Mode OTHERS (NOT PSK – change to OTHERS)" throwing me in a world of pain, because this 062 menu' entry DOES NOT EXIST!
In the new FT-891 menu interface this setting is named 08-01!!!! - 08-03 OTHER DISP = 1500 KHz
This set the displayed frequency offset in DATA mode. That's ok for me - 08-04 OTHER SHIFT = 1500 KHz
This set the carrier point in data mode. All the howto's out there says "This widens the audio bandwidth". I think this setting has NOTHING to do with the audio bandwidth... this value is good for me. - 08-05 DATA LCUT FRED = OFF
- 08-07 DATA HCUT FREQ = OFF
Those two settings are for audio filtering. I'm not using any of those filters, so they're OFF. - 08-09 DATA IN SELECT = REAR
This select the input jack for data mode. REAR select the input signals from the RTTY/DATA jack on the rear panel. - 08-10 DATA PTT SELECT = RTS
This is the PTT control during sending / receiving data.
We are using RTS; other options can be checked on the Advanced Manual for the FT891. - 08-12 DATA BFO – USB
Set the data carrier oscillator injection side for the DATA mode. USB works fine for me. - 11-05 – SSB MIC SELECT = REAR
This selects the microphone input jack for SSB Mode!
THIS IS VERY IMPORTANT, and it was SOURCE OF HORRENDOUS CURSES!
It you don't set this, when you transmit from FLDIGI, no audio will be transmitted from your computer, but from your MIC!!! And you will waste hours, like me, trying to detect any transmission fault from your yaesu radio!!!
In order to transmit the FLDIGI AUDIO thru the CAT INTERFACE YOU MUST SET THIS to REAR.
REAR disables the MIC circuit on the front panel and get input from the rear RTTY/DATA jack! - 16-14 DATA DATA GAIN – 50
This set the level of the AM signal input when the setting 08-09 [DATA IN SELECT] is set to REAR, as we did a few step before this.
Some howto's says 5 instead of 50, that is the default. Also, the original howto's says "16-14 DATA GAIN" and that's incorrect. Note from those howto's: "However you can adjust this once FLDIGI is working to meet your needs"
And that's all for our FT891 configuration!!!
You can find all manuals, including the Advanced Manual for the FT891 on the YAESU site, via a simple Google search.
SOFTWARE CONFIGURATION
We need to configure FLRIG (and FLDIGI) to use them with our CAT and RADIO.
All the howto's out there refers to OLD VERSIONS of FLDIGI / FLRIG, so here I go finally publishing how this can be done TODAY with a recent version of the software.
FLRIG SETTINGS:
First, open "Config", then "Xcvr" section.
Here, serial port must be the USB one (/dev/ttyUSB0 or something like that), "Baud" must be set THE SAME as the 05-06 CAT RATE setting in the radio menu. Check that! Then set RTS/CTS and 1 stop bit, and everything as you see in this picture below.

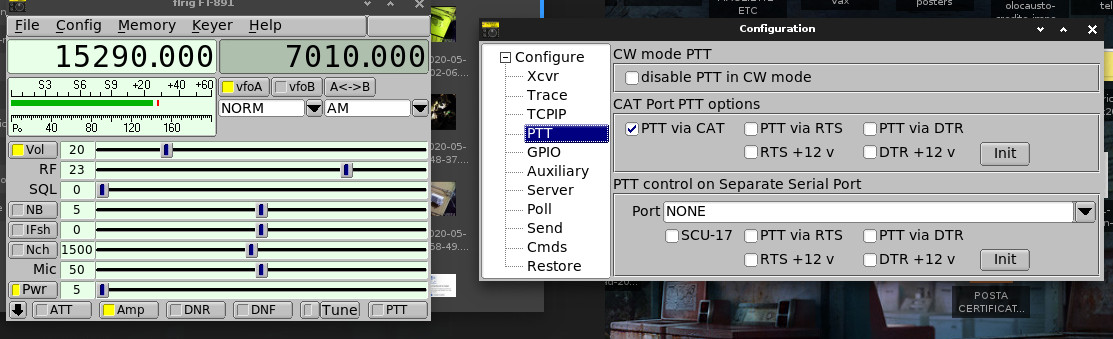
Then let's go to PTT section. Here are my settings. Just copy them!
Another thing to setup is the FLRIG TCP/IP section, as below:
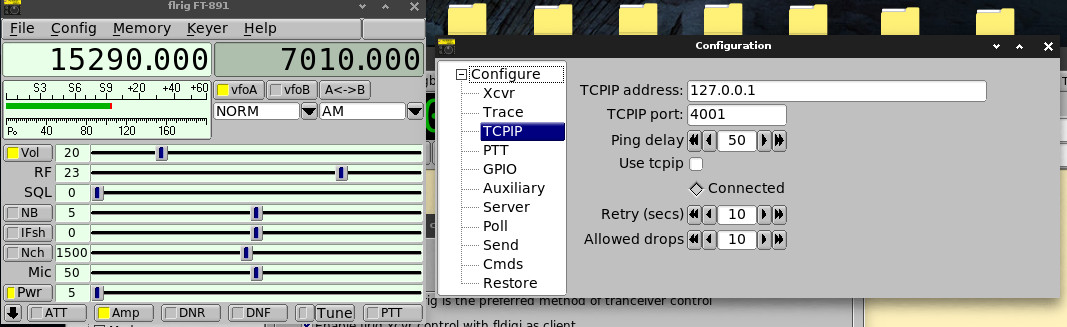
I think this is the default.
Do that, save config, exit and relaunch FLRIG.
You can now use FLRIG to control your radio, and also if you set something in your radio (frequencies, mode etc) this is reflected into flrig. NICE!
FLDIGI SETTINGS
FIRST you must launch FLRIG, THEN FLDIGI. Otherwise, FLDIGI can't control your radio!
We will use FLRIG as a tool for FLDIGI to control the radio.
Open FLDIGI, click Configure then "Config Dialog".
I think you just must setup FLDIGI as the following image:
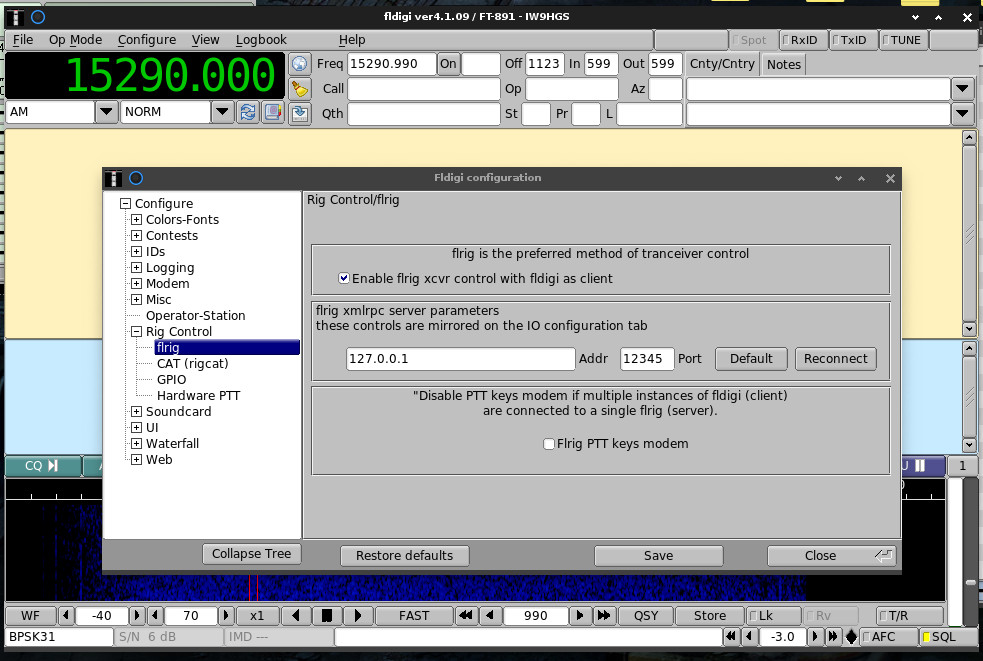
Save config, relaunch FLDIGI and now you can use it directly to control your radio, and also receive and transmit using the CAT INTERFACE.
If something's wrong, please let me know: write me at asbesto(at)gmail(dot)com 🙂
END OF THIS HOWTO!